Continuous Deployment of JBake Site to Github with CircleCI
In this previous post we saw how we can create a static blog using JBake static site generator. Once you have your site ready, next obvious question will be where to host the site? Off course there are many hosting options available. One of the easy and free way to host static pages is with Github Pages.
- In this post, we will go over
-
-
Publish our JBake site to Github Pages.
-
Achieve continuous deployment of our site using CircleCI.
-
Publish JBake site to Github Pages
We will use the same template site we built in our previous post and publish a site called 'awesomejbake'.
Step 1: Create Github Repository
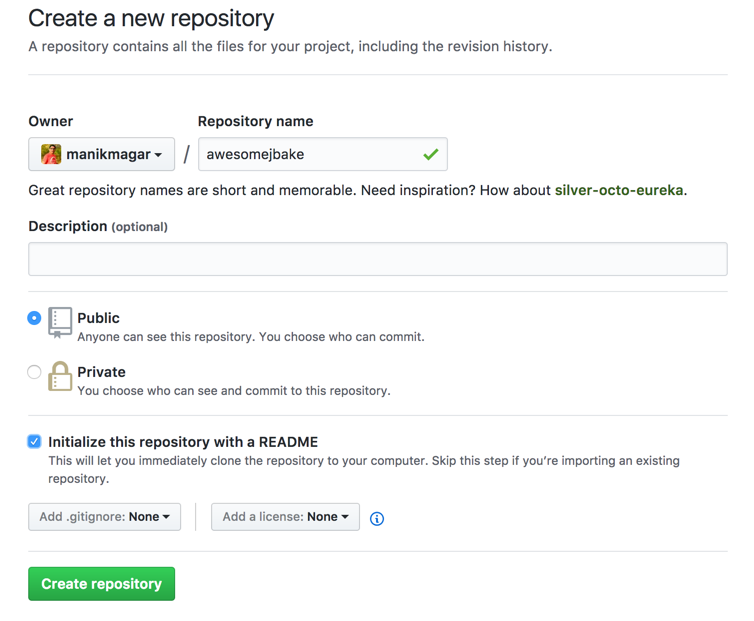
Go to Github and create new repository with name awesomebake as shown in below sample screenshot. To keep it simple, keep "Initialize this repository with a README" option checked.
Step 2: Checkout and Bake Site in local
We will use git command line client, if you don’t have git client installed, read this for how to install it.
Follow below steps to setup local site:
mkdir ~/awesomejbake
cd ~/awesomejbake
git clone https://github.com/username/awesomejbake.git
Dont forget to replace username with your Github username.
Now, copy the content of ~/awesome-jbake that we created in previous post and paste content in ~/awesomejbake directory. So, we have our template site in repo directory.
Github can either publish site from the root of the repo or a folder named docs
in the root of the repo. As we will be having other template files at the root of
the repo, let’s choose to use docs folder to publish our site.
To see our site in local, run this command while in username.github.io folder -
jbake -b . ./docs
This command will bake our jbake site and generate the output in docs instead
of default output folder.
To preview out site, run below command to serve it from docs folder -
jbake -s ./docs
So, we have our site ready to push to Github.
Push site to Github
To push our site to repo, follow below commands -
git add content assets templates jbake.properties docs
git commit -m "Upload awesome site"
git push
Go Live with Github pages
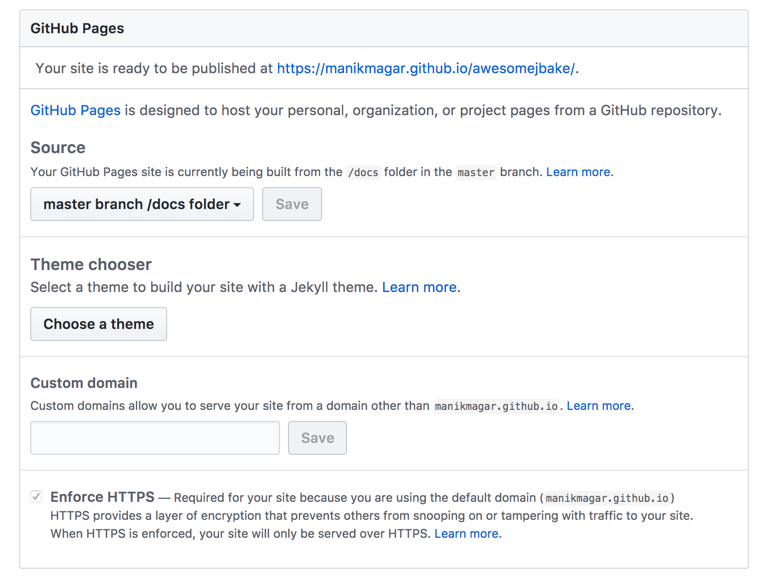
Go to Github Settings page for your repo - https://github.com/{username}/awesomejbake/settings and scroll down to Github Pages section. Under Source section, select 'masterbranch /docs folder' and click save.
You should see your site url in header - http://{username}.github.io/awesomejbake. You can access your site at that URL. We are LIVE!
Continuous Deployment to Github Using CircleCI
We have our site live at Github. We can now keep adding new content in our ~/awesomejbake/content folder. Once we add content, we must bake our site again and push the latest content and generated /docs to github. We can either bake locally or go for online continuous deployment.
Option 1: Local baking and Publish
Bake your site locally and commit/push baked content to github. Everytime you add/modify content, you will follow part Step 2 above to bake and push the site. This option ties you to your local machine to publish your site. Remember we saw few options to author your content online. You may not be able to take full advantage of online editing with this option.
Option 2: Continuous Deployment via Online CI
Step 1: Login/Sign up to CircleCI and build your project.

Step 2: Add a circle.yml file in ~/awesomejbake/. Add below content to this file-
machine:
  pre:
    - git config --global user.name "CircleCI"
    - git config --global user.email "circleci@circleci.com"

dependencies:
  pre:
    - curl -s "https://get.sdkman.io" | bash
    - sdk install jbake 2.5.1

test:
  override:
    - sdk version
    - sdk current jbake

deployment:
  master:
    branch: master
    commands:
      - rm -rf docs/*
      - jbake -b . ./docs
      - git add docs
      - git commit --message "Generated site on $(date) [ci skip]"
      - git push origin master
Step 3: Then push this file to github-
git circle.yml
git commit -m "Added circleci"
git push
Next time when you add a content to your github repository, CircleCI should start the build and deploy new site back to docs folder.
Permissions for CircleCI to Commit to your repo
For git push to work from circle ci, you must add deploy key to circleci with these instructions.
Conclusion
We built our JBake site and hosted it on Github Pages. Also, we saw how we can publish out site to github.
Hope this helps you to bake your own site. Keep Baking!
Stay updated!
On this blog, I post articles about different technologies like Java, MuleSoft, and much more.
You can get updates for new Posts in your email by subscribing to JavaStreets feed here -
Lives on Java Planet, Walks on Java Streets, Read/Writes in Java, JCP member, Jakarta EE enthusiast, MuleSoft Integration Architect, MuleSoft Community Ambassador, Open Source Contributor and Supporter, also writes at Unit Testers, A Family man!